
Reverting to a Restore Point
You can use the Microsoft System Restore utility (rstrui.exe) to revert the state of your computer to back to a previous restore point. This procedure is called System Restore.
| Important Note: Always consult with a technical support professional before you attempt to revert your computer back to a System Restore Point. Always back up your computer first. |
System Restore does not restore your documents, pictures, or other personal data. U-Recover removes this limitation and allows you to recover your personal documents from a restore point.
| Important Note: System Restore is a built-in part of the Microsoft® Windows® operating system. U-Recover is a utility for recovering individual files from a System Restore snapshot. U-Recover does not restore your computer. As such, we cannot provide you with technical assistance in restoring your computer. If you need help with repairing or restoring your computer, please contact your technical support professional. |
Note: The following information about System Restore is provided as a courtesy only. Always consult with a technical support professional before you attempt a System Restore.
Important: Recover your personal files first
The System Restore might delete the restore point when the operation is complete. System Restore does not restore your personal documents, pictures, or other personal data. If the restore point contains personal files that you want to recover, you should expose the restore point and copy out personal any files that you need, either to your personal folders or to another disk volume (not C:). Then unexpose the restore point. Do this before you attempt a System Restore.
We recommend that you always expose the snapshot to verify that it is not corrupt and has the correct files you need. Don't forget to unexpose the snapshot before you attempt the System Restore.
How to Start System Restore
Method 1: In U-Recover, right-click (or long press) anywhere inside the window. A popup menu will appear. Select Start System Restore. This will start the Microsoft System Restore utility (rstrui.exe). U-Recover will warn you if there are any exposed snapshots.
Method 2: In the Windows Search box type system restore and press Enter.
Method 3: Use the following procedure:
- Open the Control Panel.
- Navigate to System and Security -> System.
- click on System Protection (left).
- click on the button System Restore.
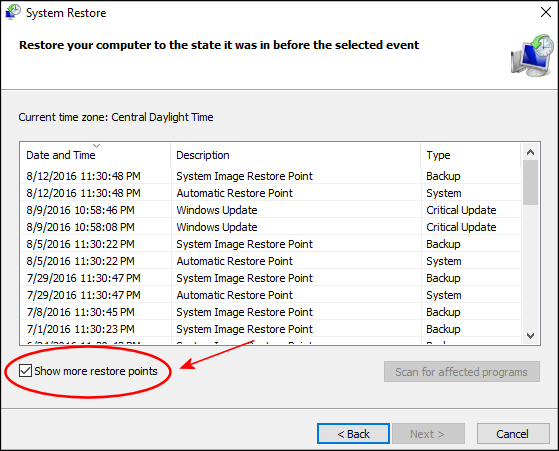
Select a Restore Point
System Restore will offer to use the most recent restore point on the computer. You can also choose to select a different restore point.
How to view more restore points
To view more choices check the box Show more restore points (bottom left). This will display older restore points. It will also display regular volume snapshots.
Using a regular volume snapshot (not recommended)
In an emergency if you do not have a restore point available, you might be able to restore your computer from a regular volume snapshot instead of from a restore point. (See Show more restore points above.) This is not recommended, however, because a regular snapshot is merely an image of the computer in a “crash-consistent” state, which is equivalent to simply turning off the power.
Note: Always consult with a technical support professional before attempting to do a System Restore. Always do a full backup first.
For more information
For more information about System Restore, see How to Use System Restore on Windows 11.
| U-Recover for Previous File Versions |