Viewing Snapshots in Windows Explorer
To view a volume snapshot you can use three different methods.
Method 1: Using U-Recover
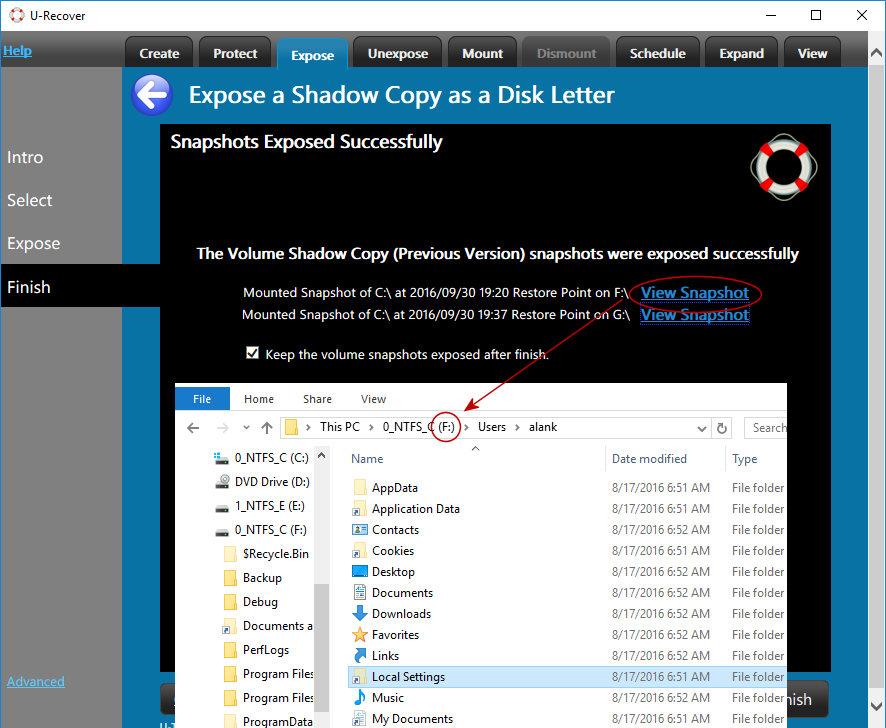
To view files using administrator rights, click on the tab View (top), then click on the button View Previous Versions. You will need to first expose the snapshot as a disk letter. See Exposing Volume Snapshots for instructions.
A list of exposed snapshots will be shown. Click on View next to the snapshot that you want to view. This will launch Windows Explorer and navigate to the root folder of the disk letter that is hosting the snapshot (for example, E:).
Alternate method: Right-click (or press and hold down your finger) while inside of U-Recover. A pop-up menu will appear. Select Explore Files using Admin Rights. Navigate to root of the exposed snapshot (for example, E:).
Method 2: Using Windows Explorer
If you selected the installation option to Integrate U-Recover with Windows File Explorer you can view snapshots from inside of Windows Explorer using the right-click menu.
- Launch Windows Explorer (EXPLORER.EXE)
- Navigate to the folder that you want to view.
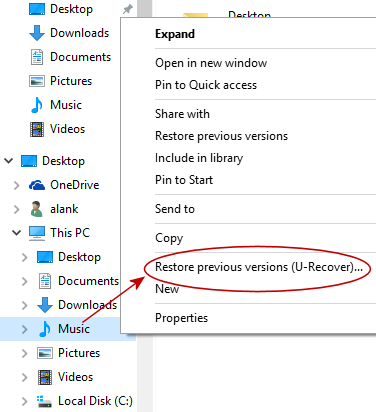
- While the cursor is hovering over the folder, right-click the mouse button (or hold your finger down). A popup menu will appear (see below).
- In the popup menu click on Restore previous versions (U-Recover)...
- You will see the UAC security prompt. Click on yes to continue.

 U-Recover will automatically start and select the tab Expose (top) and navigate to the panel for selecting which snapshot you want to view.
Select the snapshot by assigning it a disk letter (for example, E:). Click on Next, Expose, and View Snapshot.
A new Windows Explorer window will open that will show you all of the shadow files in the folder that you had selected in step 2 above.
Keeping the volume snapshot exposed after finish
If you check the box Keep the volume snapshot exposed, U-Recover will persist the temporary disk letter after you quit the application.
The disk letter will remain exposed until you explicitly unexpose it (including across reboots). It will remain exposed until system drops the snapshot, for example if the reserved disk space fills up.
Caution: Do not depend on the files in the snapshot to remain available indefinitely. The Windows operating system can drop a snapshot at any time without warning, even if it is exposed. For example, an unexpected crash or heavy workload can trigger the Volume Snapshot Service (VSS) to drop snapshots.
Method 3: Use Windows Explorer's built-in Previous Versions menu
Windows Explorer offers its own Previous Versions menu item in the popup menu (see above). The intent is to allow users with old snapshots that were created on Windows 7 or Windows Vista to be recovered on Windows 11.
You can also use the built-in menu to open an Explorer window to view the content of a snapshots created by U-Recover.
Viewing Private Files
The Microsoft built-in Previous Versions menu item has a significant limitation: You cannot view private files. You can only view files that are owned by yourself or that are public, even if you have full administrative rights on the computer.
U-Recover exposes the snapshot as a disk letter. The snapshot looks exactly like a real read-only disk volume. This means that your administrative rights are honored exactly like on a normal disk volume, allowing you to view (and copy) all of the files in the volume snapshot.
| U-Recover for Previous File Versions |
